
 |
Stabilize a take
The stabilization offered by Vicon CaraPost is the process of removing unwanted motion from the face points. This unwanted motion can be caused by the head rig moving relative to the skull during violent head motions, or by the cameras moving relative to the rest of the head rig.
To stabilize a take, you must first have tracked and (if necessary) cleaned the relevant data.
CaraPost offers both manual and assisted options for stabilization:
❙ Manual Stabilization, where stabilization relies purely on stabilization points that you select, is faster to set up and use, but does not include any additional stabilization from CaraPost. The stabilization error (see About the stabilization error) is simply reported by CaraPost at the end of the process.
❙ Assisted Stabilization, where CaraPost automatically improves on the information that you provide, usually produces the best stabilization. The stabilization error is minimized by CaraPost throughout the whole Active Range. However, it requires slightly more setup than the manual process and can take longer to run, depending on the properties you specify.
For both options, the first step is to select the stabilization points. For more information, see:
❙ About the stabilization error
Tip: To display the results of stabilization, ensure that
on the View menu, Toggle
Show Stabilized is selected.
When this option is selected, stabilized results are displayed in 3D view.
Select stabilization points
The first step for both assisted stabilization and manual stabilization is to select stabilization points in a frame where the actor’s face is in a neutral pose. CaraPost uses this frame (the base frame) as the 3D reference frame to transform the point data from other frames. To stabilize all frames in the Active Range (or the whole take if no Active Range is selected), CaraPost uses the frame-to-frame correspondence of the stabilization points to define the 3D transform that is applied to the point data for each frame.
To select stabilization points:
1. If necessary, on the timebar, set an Active Range, ensuring that the range includes only fully tracked and cleaned data.
2. Scrub through the take and note at least three points that you can use for stabilization. To ensure the points provide good stabilization, look for points that:
– Move as little as possible throughout the Active Range (that is, they are unaffected by changes in the actor’s expression).
– Are present in every frame throughout the Active Range (that is, that any gaps have been filled).
For example, you may find that the inner corners of the eyes or on the upper cheeks near the ears are relatively stable, compared with other more mobile points.
Tip: Points on the brim can also contribute to stabilization, but only include them if they are fixed relative to the skull coordinate frame. If the brim moves relative to the face points during the take (eg slips slightly down the actor’s forehead), do not include them. If you want to include brim points, ensure Use Brim Points is selected in the Properties pane (for information, see Use Brim Points in the Stabilization Parameters section in the Vicon CaraPost Reference
3. Within the specified active range, scrub to a frame in which the face is in a neutral pose and all the stabilization points are clearly visible. This will be the base frame, on which stabilization is based. Ensure that the chosen base frame is the current frame.
4. In the View pane, CTRL+click on the three or more points that you noted previously.
Selected points turn green.
5. Depending on the type of stabilization you want to perform, for the next steps, see Manual stabilization or Assisted stabilization.
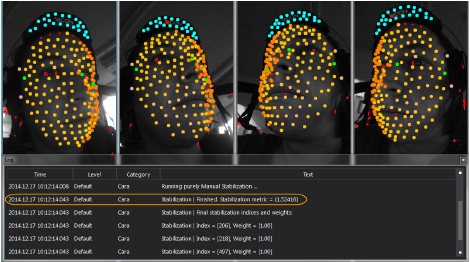
Manual stabilization
Manual stabilization takes a minimum of three points that you have selected as being relatively unaffected by changes in expression, and then for each frame maps those points on the current frame to the same points on the base frame.
Although a minimum of three points is required, if you can find more stable points in the Active Range, select these too, as they will improve the results of the stabilization process.
Important: Ensure that any points you select are both as stable (ie static) as possible throughout the Active Range and are present in every frame in the Active Range. If you select points that do not meet these criteria, stabilization will be impaired.
To perform manual stabilization:
1. Ensure that you have selected at least three gap-free points in the base frame, as explained in Select stabilization points.
2. If you want to select any points on the brim, ensure Use Brim Points is selected in the Stabilization Parameters section of the Properties pane.
Important: Only select brim points if the brim is completely stable. Also note that selecting any Stabilization Parameters other than Use Brim Points has no effect on manual stabilization.
3. On the Process menu, click Stabilize Data [Manual].
The Log pane displays the progress of the stabilization and the stabilization error. The lower the error, the better the stabilization.
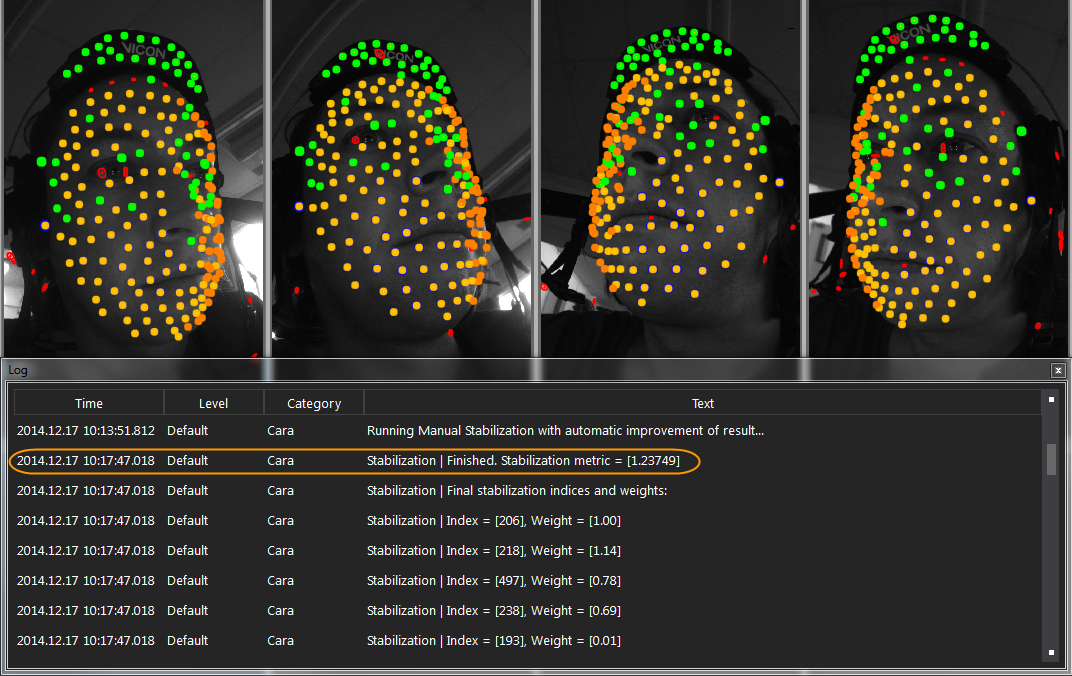
Assisted stabilization
Normally, assisted stabilization produces better results than manual stabilization, as the assisted process examines all the face points, and where they are consistent with the original selection, enables them to contribute to the final stabilization result and to minimize the stabilization error across the whole of the Active Range.
Tip: Assisted stabilization is normally not as fast as manual stabilization, depending on the number of Processing Iterations specified, the Stable Points Percent and whether Use Brim Points is selected, which may all require more intensive processing.
To perform assisted stabilization:
1. Select at least three gap-free points from the current frame, as explained in Select stabilization points.
2. In the Properties pane, expand the Stabilization Parameters section and make any required changes. For information on the stabilization parameters, see the Stabilization Parameters section in the Vicon CaraPost Reference. .
3. On the Process menu, click Stabilize Data [Assisted].
More points are selected and given the weighting specified in the Base Frame Weighting and Inter Frame Weighting fields in the Stabilization Parameters section of the Properties pane. The stabilization generated using these points minimizes the stabilization error across the whole of the Active Range.
In the 3D view, green stabilization points are displayed and in the Log pane, the stabilization error is displayed, along with a list of the stabilization points used, and the weighting used for each stabilization point.
The following illustration shows a take in which the brim was static throughout, so the Use Brim Points property was selected, enabling the automatic selection of the brim points as well as the original three selected points and other stabilization points added by CaraPost.
About the stabilization error
The stabilization error is a weighted sum of the following errors:
❙ Base Frame Stabilization Error The root-mean-square of the differences between the percentage specified by the Stable Points Percent most stable points in each frame and the corresponding points in the base frame (calculated across the whole of the Active Range).
❙ Inter Frame Stabilization Error The root-mean-square of the differences between the percentage specified by the Stable Points Percent most stable points in each frame and the previous frame (calculated across the whole of the Active Range).
Stabilize multiple takes
To minimize the chance of ‘jumps’ between takes that are to be used together, ensure that for all the takes:
❙ The base frame shows a face with a neutral expression.
❙ The same points are selected for stabilization.
❙ The same points are used for alignment (see Align face data in 3D space),
Tip: If you are using the Stabilize Data [Assisted option], different sets of points may be automatically selected for use in stabilization in multiple takes.